I get asked this all the time, how do I make a bootable USB drive on my Windows notebook. Natively Windows 10 does not have a great way to burn an ISO to a USB device with out installing additional software. An easy way to do this, especially if you are like me and have VirtualBox and a few Linux VMs already built, is to simply burn the ISO to a USB stick.
Before you do this, you will need VirtualBox installed, and a Linux VM that has the Extensions already installed. Also, you can copy over the ISO to the VM, or make the ISO visible on a shared folder that the Linux VM can see.
Next, boot your VM and then we need to add the USB device. In the Settings for the VM, navigate to the USB menu;

From here, we can make a USB device available to the VM. This is done by adding a USB filter to the VM, picking the device that we want to make visible to the VM. Often I have found that USB drives do not also identify themselves very well, so before plugging in the drive, check the list of current devices.

Click on the Add icon, to see the current lost of USB devices

Now that we have a list, plug in the device, and the new device will show.

The “Unknown device” here, is actually a USB3 USB stick I purchased inexpensively from Micro Center. Click on the device to add it to the USB filter rules. Optionally, you can use the Blue dot icon to make ALL USB devices visible to the Linux VM, but this may cause issues with some of your USB devices.

Then click OK to make the rule active.
Next, simply unplug, and then plug in the USB drive. The USB device should be visible to the VM now.If you are on the console, you should see a message like this;

You can also use the lsub command to display all USB devices visible to the the VM.

If you missed the console message, you can always use fdisk –l to show the devices. The *G device is the USB stick/

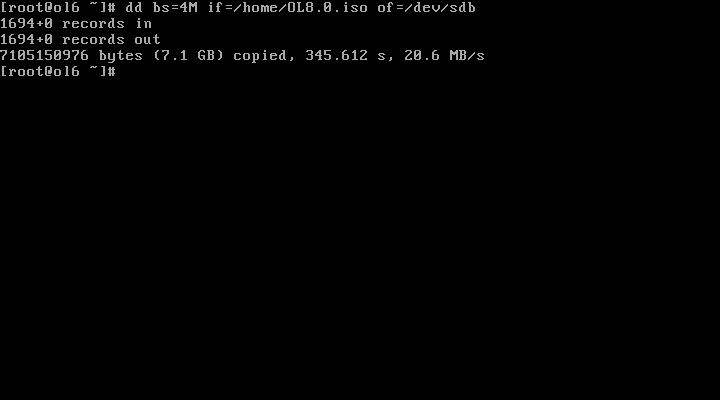
Now that we know than /dev/sdb is the device we can burn the ISO. This is the easy part, as Linux includes the dd command, that allows you to ready from a file or device and write to a file or device. In this case we will ready from the input file ( /home/OL8.0.iso) , the if parameter, and output defining the of parameter. The Block Size ( bs) of 4M generally helps for faster IO. The final command being “dd bs=4M if=/home/OL8.0.iso of=/dev/sdb”

This command will run for a few minutes, and eventually finish, you can now remove the USB and boot from it. In my case, I will be booting the ISO from an Intel NUC! That BLOG post should be next!
I’m using kali linux and installed Windows 10 on my virtual box. Can i make a bootable usb in windows 10 that ia installed in the vm or will there be errors
Yes, there are programs you can buy that will write an ISO to a USB under windows.
You don’t have to buy anything, just install Microsofts USB making tool on the vm…
https://www.microsoft.com/en-us/download/windows-usb-dvd-download-tool
And the ISO is free here, you need a windows key if you want to activate it, https://www.microsoft.com/sv-se/software-download/windows10ISO
True, but not everyone needs an ISO for only windows. Last I saw MS did not support Linux, or Solaris, or FreeNas or any of the thousands of other ISOs you might need to burn.
So just use Rufus, it’s free and supports practically any ISO file.
Yes, as is Etcher… but learning how to do it with dd is great, especially for folks that can not just download free software online.